The Ultimate Guide to Perfect Crispy Pork Belly: A Step-by-Step Recipe for Juicy, Tender Meat and Unbeatable Crackling
If you’re looking for the perfect pork belly recipe that delivers both tender meat and crispy crackling, look no further. This slow-roasted crispy pork belly is a game-changer. Whether you’re hosting a dinner party or simply craving a delicious meal, this recipe will impress even the most discerning palates. With its rich flavor, melt-in-your-mouth texture, and incredible crackling, it’s no wonder this dish has become a favorite among home cooks and food enthusiasts alike.
In this article, we’ll take you through everything you need to know about making the best slow-roasted crispy pork belly. From selecting the right cut of meat to mastering the cooking techniques, we’ve got you covered. Plus, we’ll share tips on how to serve it, what sauces pair well, and even how to store leftovers for future meals.


Why Slow-Roasted Crispy Pork Belly Is a Must-Try
There’s something truly special about a perfectly cooked pork belly. The combination of juicy, tender meat and crispy, bubbly crackling is a culinary delight that few other dishes can match. But achieving that perfect balance requires more than just throwing the meat in the oven and hoping for the best. It takes a specific approach—something that many home cooks often overlook.
This recipe focuses on three key steps that ensure success every time: not scoring the skin, roasting at a low temperature first, and leveling the pork to ensure even heat distribution. These techniques are backed by years of experimentation and feedback from thousands of home cooks who have tried the recipe and loved it.
But why does this method work so well? Let’s break it down.


Selecting the Right Cut of Pork Belly
The foundation of any great pork belly dish starts with choosing the right cut. Here’s what to look for:
- Even Thickness: Look for a piece that’s at least 3.25 cm (1.3 inches) thick. This ensures that the meat cooks evenly without becoming too dry or overcooked.
- Flat Skin: Avoid pieces with wrinkled or wet skin, as these tend to produce uneven crackling. Instead, opt for a flat, dry skin that allows for even browning.
- Not Vacuum-Packed: While vacuum-packed pork belly is convenient, it often results in less desirable crackling. If possible, choose fresh-cut pork from a local butcher.
- No Scoring: One of the biggest myths in pork belly cooking is that scoring the skin is necessary for good crackling. In reality, scoring can actually damage the skin and lead to uneven results. We’ll explain why in the next section.
By following these guidelines, you’ll set yourself up for success before even turning on the oven.
The Secret to Perfect Crackling: Don’t Score the Skin
If you’ve ever tried to make crispy pork crackling at home, you might have heard the advice to score the skin. But here’s the truth: scoring the skin is not only unnecessary—it can be counterproductive.


Why? Because when you score the skin, you risk creating small cuts that allow juices from the meat to seep into the skin during roasting. This can result in rubbery patches of skin that don’t crisp up properly. Additionally, scoring can cause the skin to burn if the heat is too high, leading to an unappealing, charred texture.
Instead of scoring, we rely on a different technique: using salt to create bubbles. Salt helps draw out moisture from the skin and encourages the formation of those perfect, bubbly cracks. This is why it’s essential to sprinkle salt evenly across the entire surface of the skin, from edge to edge.
Cooking Techniques That Guarantee Success
Once you’ve selected your pork belly and prepared the skin, it’s time to move on to the actual cooking process. Here’s a step-by-step breakdown of the method that ensures perfectly cooked meat and crackling:

1. Dry the Skin Overnight
Place the pork belly on a plate and leave it uncovered in the refrigerator overnight. This helps dry out the skin, which is crucial for achieving that perfect, crispy texture.
2. Season the Flesh
Drizzle the flesh with oil and season with salt, pepper, and fennel powder (optional). Rub the seasoning into the meat, including the sides, to ensure even coverage.
3. Wrap the Flesh in Foil
Cover the flesh with foil to protect it from drying out during the slow roast. Leave the skin exposed so it can develop that signature crackling.
4. Roast at a Low Temperature
Place the pork belly in a preheated oven at 140°C (285°F) for 2 1/2 hours. This low-and-slow approach allows the fat to render and the meat to become incredibly tender without overcooking.
5. Level the Pork
After the initial roasting, remove the pork from the oven and use balls of foil to prop it up so the skin is level. This ensures even heat distribution, which is essential for consistent crackling.
6. Finish with High Heat
Increase the oven temperature to 240°C (465°F) and roast the pork for an additional 30 minutes. This final burst of heat creates the perfect, golden-brown crackling.
7. Rest Before Slicing
Let the pork rest for 10 minutes before slicing. This allows the juices to redistribute, ensuring that each bite is moist and flavorful.
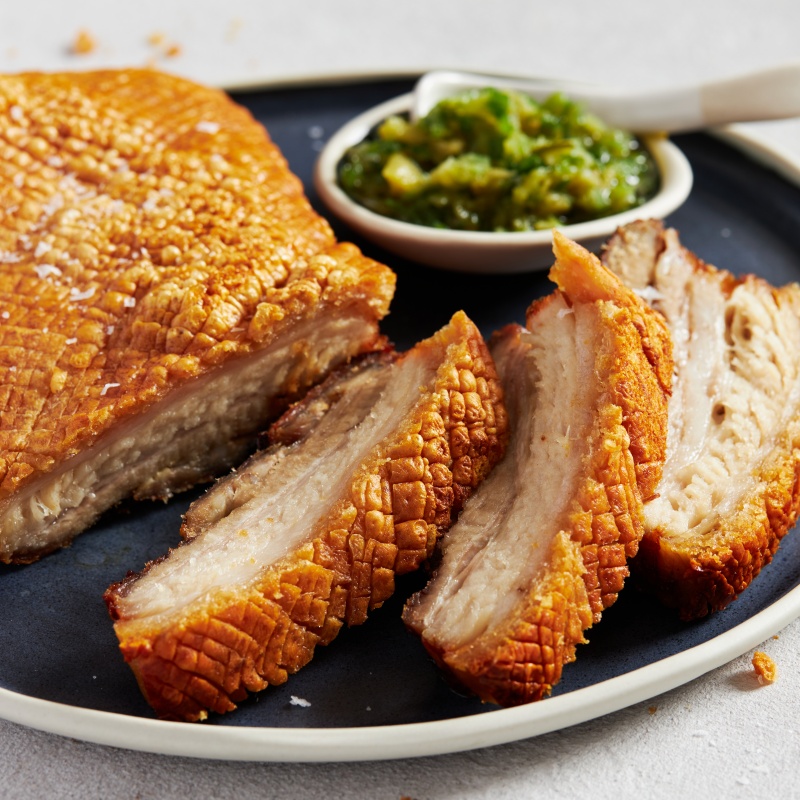
Serving Suggestions and Sauce Pairings
While the pork belly itself is a standout dish, pairing it with the right sauce can elevate it to another level. Here are some popular options:
- Apple Sauce: A classic pairing that adds a sweet and tangy contrast to the rich, savory meat.
- Vermouth Jus: A sophisticated sauce made from concentrated beef stock and vermouth, offering a deep, complex flavor.
- Honey Mustard Sauce: A sweet and tangy option that complements the pork beautifully.
- Dijon Mustard: A simple but effective choice that adds a sharp, savory kick.
- Salsa Verde: A fresh, herbaceous sauce that brings a bright, zesty note to the dish.
- Cauliflower Puree: A creamy, elegant side that pairs well with the richness of the pork.
For a fine dining-style presentation, consider serving the pork on a bed of cauliflower puree, topped with a drizzle of vermouth jus and a dollop of apple sauce. Add a few edible flowers for a touch of elegance.
Storing and Reheating Leftovers
One of the best things about this recipe is that it’s perfect for make-ahead meals. Leftover pork belly can be stored in the refrigerator for up to 5 days and reheated with ease.
To reheat, separate the crackling from the meat. Reheat the meat in the microwave or on the stovetop, and crisp up the crackling in a hot oven. Alternatively, you can slice the pork and pan-fry it for a quick, flavorful meal.
If you plan to make the dish in advance, wrap the meat in foil again and pour some of the rendered fat back into the package. This helps keep the meat moist and prevents the crackling from becoming soggy.
Final Thoughts
Making the perfect slow-roasted crispy pork belly is all about technique, patience, and attention to detail. By following the steps outlined in this guide, you’ll be able to achieve restaurant-quality results in your own kitchen.
Whether you’re a seasoned cook or just starting out, this recipe is a must-try. With its incredible flavor, tender meat, and unbeatable crackling, it’s sure to become a favorite in your repertoire. So grab a piece of pork belly, follow the steps, and get ready to enjoy a meal that’s as satisfying as it is delicious.
External Link: How to Make Vermouth Jus for Pork Belly