Beef tenderloin is one of the most prized cuts of meat, known for its exceptional tenderness and rich flavor. It’s a staple in many households, especially during special occasions or when preparing a gourmet meal. However, the cost of purchasing a pre-trimmed center-cut beef tenderloin from a butcher can be quite steep—often reaching $90 per kilogram or more. This has led many home cooks to explore alternative methods to save money while still enjoying the same high-quality results. By learning how to trim and cut a whole beef tenderloin yourself, you can significantly reduce the cost of this premium cut without compromising on taste or quality. This guide will walk you through the entire process, from selecting the right piece of meat to preparing it for roasting, ensuring that you get the best value for your money.
The key to saving money lies in understanding the difference between a whole untrimmed beef tenderloin and a pre-trimmed center-cut. A whole tenderloin typically comes at a lower price point, often around $20 to $36 per kilogram, depending on the store and any ongoing promotions. While it may appear less appealing due to its raw, unprocessed state, this cut offers incredible flexibility. Once properly trimmed and cut, it can yield a center-cut roast that is just as flavorful and tender as the pre-trimmed versions sold in stores. The savings can be substantial, with some home chefs reporting up to 70% in cost reductions by taking on the task themselves. This not only makes it more affordable but also allows for greater control over the final product, ensuring that you get exactly what you want for your next meal.
In addition to cost savings, there are several other benefits to trimming your own beef tenderloin. For one, it gives you the opportunity to customize the cut according to your preferences. You can choose to keep certain parts of the meat, such as the flappy ends or the tail, which can be used for other recipes like stir-fries or soups. This means that no part of the meat goes to waste, making the process both economical and sustainable. Moreover, the act of trimming and cutting the meat can be a rewarding experience, offering a sense of accomplishment and deeper connection to the food you prepare. Whether you’re an experienced cook looking to refine your skills or a beginner eager to learn, mastering this technique can elevate your culinary abilities and open up new possibilities in the kitchen.


Understanding the Whole Beef Tenderloin
Before diving into the trimming and cutting process, it’s essential to understand what a whole beef tenderloin looks like and how it differs from a pre-trimmed center-cut. A whole tenderloin is a long, slender cut of meat that runs along the spine of the cow. It consists of two main sections: the thick, central portion known as the “center cut” and the thinner, tail-like end. The center cut is the most desirable for roasting because of its even thickness and consistent shape, which ensures uniform cooking. However, the rest of the tenderloin, including the flappy ends and the tail, can also be used effectively if prepared correctly.
One of the first steps in working with a whole tenderloin is to remove the silver skin, a thin, transparent membrane that covers the meat. This layer can become tough and rubbery when cooked, affecting the texture of the final dish. To remove the silver skin, use a sharp knife and carefully slide it under the membrane, holding it taut at a 45-degree angle as you work your way along the length of the meat. This technique helps minimize the amount of meat you lose while ensuring the skin is completely removed. Once the silver skin is gone, the surface of the tenderloin should be smooth and ready for further preparation.
Another important aspect of working with a whole tenderloin is the need to dry it off before trimming. Since these cuts are often sold in vacuum-sealed packages, they can be wet and slippery, making them difficult to handle. Using paper towels to pat the meat dry not only improves grip but also helps prevent the knife from slipping during the trimming process. This simple step can make a significant difference in the overall ease of handling the meat, especially for those who are new to the process.


Step-by-Step Trimming Process
Once the tenderloin is clean and dry, the next step is to trim it into the desired portions. Start by identifying the center cut, which is the thickest and most uniform part of the meat. This section will serve as the main roast, so it’s crucial to ensure it’s evenly thick throughout. If the tenderloin is smaller than the recommended size (around 2.25 to 2.5 kilograms), you may need to adjust the trimming accordingly. In such cases, consider roasting the entire piece instead of just the center cut, tying it at regular intervals to maintain its shape during cooking.
After removing the center cut, the remaining pieces—such as the flappy ends and the tail—can be repurposed for other dishes. These parts may not be ideal for roasting on their own, but they can be tied together and cooked as smaller roasts. Additionally, any small scraps or off-cuts can be used for stir-fries, soups, or stews. This not only reduces waste but also adds versatility to your cooking. For example, thinly sliced tenderloin can be quickly sautéed with vegetables and a savory sauce, creating a delicious and hearty meal in minutes.
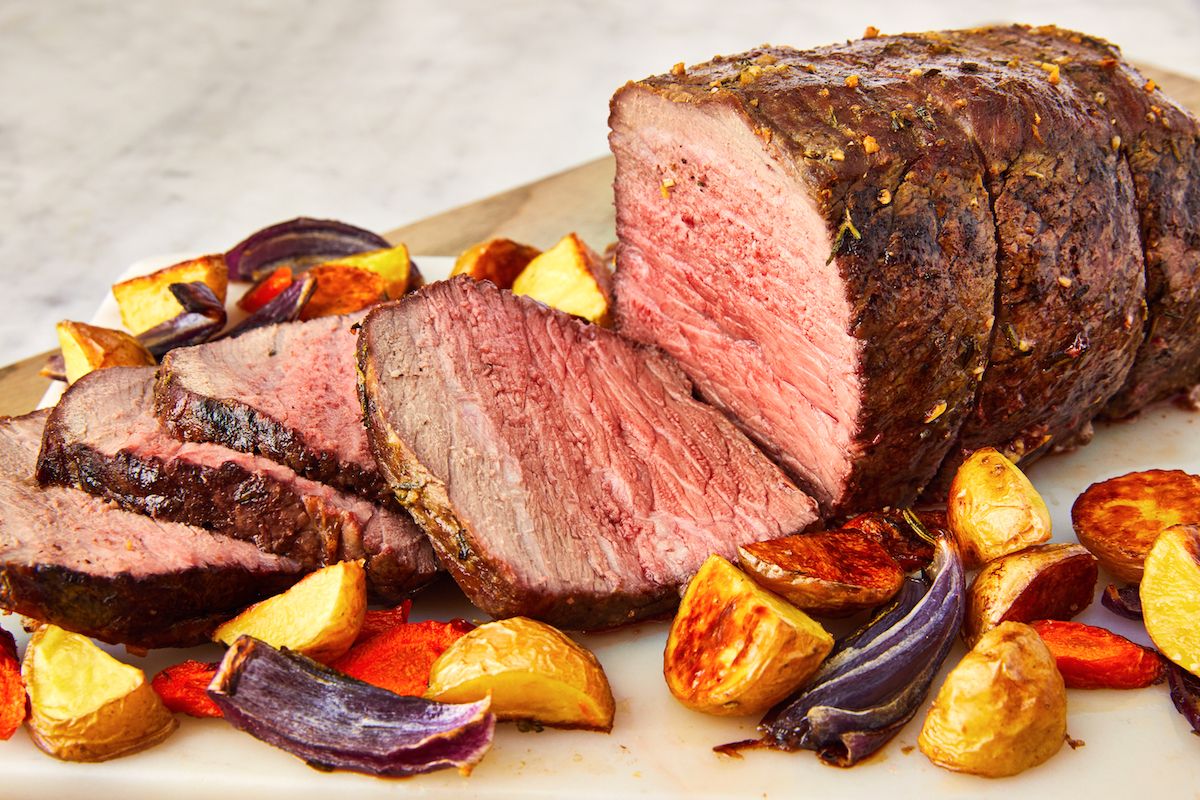
When trimming the tenderloin, it’s important to be mindful of the amount of meat you’re removing. While some trimming is necessary to achieve the desired shape and consistency, excessive cutting can lead to a loss of valuable meat. Aim to keep the center cut as large as possible while still maintaining an even thickness. This will ensure that your roast is not only visually appealing but also evenly cooked, resulting in a perfectly tender and juicy final dish.


Preparing the Center Cut for Roasting
Once the center cut has been trimmed and shaped, the next step is to prepare it for roasting. One of the most effective ways to do this is by tying the roast. Tying the meat helps maintain its structure during cooking, preventing it from sagging or flattening as it cooks. This is particularly important for larger roasts, as it ensures even heat distribution and a more attractive presentation. To tie the roast, use kitchen twine and secure it at regular intervals, typically every 2.5 centimeters (1 inch) along the length of the meat.
Tying the roast also helps retain moisture, which is crucial for achieving a tender and juicy result. As the meat cooks, the juices are kept within the confines of the tied roast, enhancing the flavor and texture of the final dish. This technique is especially beneficial when using a high-temperature roasting method, as it prevents the meat from drying out. Additionally, tying the roast can help create a more even crust, giving the exterior a nice, golden-brown color that enhances the overall appearance of the dish.
For those who prefer a more hands-off approach, some butchers offer pre-tied center cuts, which can save time and effort. However, if you’re trimming your own tenderloin, taking the extra step to tie it yourself can make a noticeable difference in the final outcome. Not only does it improve the texture and appearance of the roast, but it also demonstrates a level of care and attention that can elevate your cooking experience.

Utilizing the Remaining Pieces
After the center cut has been prepared for roasting, the remaining pieces of the tenderloin can still be put to good use. The flappy ends and the tail, while not ideal for roasting on their own, can be tied together and cooked as smaller roasts. This method allows you to maximize the use of the entire cut, ensuring that nothing goes to waste. When tying these pieces, it’s important to tuck in any sharp or pointed ends to create a more uniform shape. This not only improves the visual appeal of the roast but also helps it cook more evenly.
In addition to roasting, the leftover pieces can be used for other culinary purposes. For instance, the flappy bits can be incorporated into a stir-fry, where their tender texture pairs well with a variety of vegetables and sauces. Similarly, the tail end can be sliced into smaller pieces and used in soups or stews, adding depth and richness to the dish. These alternative uses not only make the most of the meat but also provide opportunities to experiment with different cooking techniques and flavors.
Another benefit of using the remaining pieces is the ability to freeze them for future use. If you’re preparing a large roast and don’t plan to use all the meat immediately, consider slicing the leftover pieces and freezing them in portions. This way, you can have ready-to-use tenderloin on hand for quick meals or last-minute dinner plans. Freezing the meat also helps preserve its quality, ensuring that it remains fresh and flavorful for months to come.
Cost-Saving Tips and Best Practices
Trimming and cutting your own beef tenderloin can lead to significant cost savings, but there are several tips and best practices that can help you maximize these savings. First, always look for promotions or sales on whole tenderloins, as these cuts are often available at a discounted rate. Many grocery stores and specialty meat shops offer seasonal deals, making it easier to find a high-quality cut at a lower price. Additionally, purchasing a larger tenderloin can result in better value, as the cost per kilogram tends to decrease with larger quantities.
Another way to save money is to shop at local farmers’ markets or independent butcher shops, where you may find fresher cuts at competitive prices. These establishments often carry a wider variety of meats and can provide personalized recommendations based on your specific needs. By building a relationship with a trusted butcher, you can gain access to exclusive deals and high-quality products that may not be available in larger supermarkets.
Finally, investing in a good set of kitchen tools can make the trimming and cutting process more efficient and enjoyable. A sharp, high-quality knife is essential for precise cuts, while a sturdy cutting board provides a stable surface for working with the meat. Additionally, having a pair of kitchen shears on hand can be useful for cutting through any tough connective tissue or excess fat. With the right tools and techniques, trimming your own beef tenderloin becomes a straightforward and rewarding task that can enhance your cooking experience.
Conclusion: The Benefits of Self-Trimming
Trimming and cutting your own beef tenderloin offers a range of benefits that extend beyond just cost savings. By taking the time to prepare the meat yourself, you gain greater control over the final product, ensuring that it meets your specific needs and preferences. This level of customization allows you to create a roast that is not only delicious but also perfectly suited to your taste and cooking style. Additionally, the process of trimming and cutting can be a satisfying and educational experience, providing valuable insights into the characteristics of different cuts of meat and how they can be used in various recipes.
Moreover, the ability to utilize every part of the tenderloin reduces waste and promotes sustainability, making it a more environmentally friendly option. By repurposing the flappy ends and the tail, you can create additional meals that add variety to your menu while minimizing the environmental impact of food waste. This approach not only saves money but also encourages a more mindful and responsible way of cooking.
Ultimately, trimming and cutting your own beef tenderloin is a practical and rewarding skill that can enhance your culinary capabilities and expand your cooking repertoire. Whether you’re preparing a special occasion meal or simply looking for a more affordable way to enjoy a premium cut of meat, this technique offers a wealth of benefits that are well worth the effort. With a little practice and patience, you can master this process and enjoy the satisfaction of creating a perfectly trimmed and delicious roast every time.